How to Fix Computer Hardware -- A Free Guide
by Howard Fosdick © 2024 RexxInfo.org -- Share this under the open source CC-BY-ND license. (Please do not alter contents.)
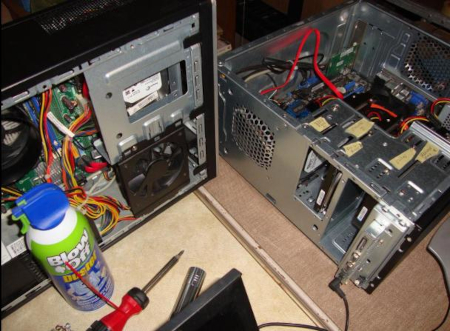
You can fix most computer hardware problems yourself. This easy guide tells you how.
It covers laptops and desktops -- not tablets and cell phones.
All the software tools I recommend are free.
You might also like my free guide How to Get a Free Computer: Build It From Cast-offs.
Here's the outline --
Read This First
Step 0: Identify the Problem
Computer
Computer -- How to Access the Configuration Panels (UEFI/BIOS)
Computer -- How to Clear Configuration Panels Memory
Computer -- Unexpectedly Shuts Down
Computer -- Overheating
Computer -- Turns On But Won't Boot
Computer -- Won't Turn On
Computer -- Power Supply Fails
Computer -- Boots into Windows But Fails Somewhere Along the Way
Computer -- Loses Date and Time
Computer -- Is Noisy
Computer -- Got Wet
Computer -- How to Create "Live USB"
Computer -- "Live USB" Fails
Mouse
Mouse -- Problems
Mouse -- Cleaning
Mouse -- Wired Mouse Problems
Mouse -- Wireless Mouse Problems
Keyboard
Keyboard -- Problems
Keyboard -- Cleaning
Keyboard -- Wired Keyboard Problems
Keyboard -- Wireless Keyboard Problems
Memory
Memory -- Errors
Memory -- How to Add More
USB Thumb Drive
USB Thumb Drive -- Problems
USB Thumb Drive -- Is Slow
USB Thumb Drive -- How to Create "Live USB"
USB Thumb Drive -- "Live USB" Fails
Display Screen
Display Screen -- Pixels Get Stuck or Die
Display Screen -- Dies Entirely
Disks
Disks -- All Disks
Disks -- Solid State Disk Drive (SSD)
Disks -- Hard Disk Drive (HDD)
Disks -- How to Add a Disk
Disks -- How to Completely Erase a Disk
Optical Disc
Optical Disc -- Disc Stuck in Drive
Optical Disc -- Disc Read Errors
Optical Disc -- Drive Fails
Internet
Internet -- Problems
Internet -- is Slow
Internet -- Wireless is Slow
Internet -- No Connection
Printer
Printer -- Suddenly Fails
Printer -- How to Maintain
Microphone and Sound
Conclusion
Contact / No Warranty
Resources
Read This First
- Before you open up any computer, always unplug it and turn it OFF! Protect yourself from a terrible electrical shock.
- Ground yourself before touching inside of any computer. Otherwise, you might give it a static shock so tiny you won't even notice -- but it could kill your circuitry. Either buy a $10 USD anti-static wrist strap, or always ground yourself by touching a metal object that will absorb a static shock prior to touching inside.
- Enter error messages to Google to see how others fixed your
problem. Why reinvent the wheel?
- Download your computer's documentation from the manufacturer's website if you don't already have it. This provides essential machine-specific information.
- You'll find my free guide on refurbishing helpful -- How to Get a Free Computer: Build It From Cast-offs.
Step 0: Identify the Problem
The first step in fixing any problem is to identify it. Don't jump to conclusions. If you have have a specific error message, google it.
If you don't have a message, look in the operating system logs, and run a scan to make sure your system is clean of viruses and malware.
To find hardware problems, run free diagnostic software for problem identification:
- Boot-time diagnostics are available in many computers'
"configuration" or "setup" panels.
(These are the so-called "UEIF" or "BIOS" panels. Learn how to access those panels here.)
- Some computers come with diagnostics installed on their drives or with diagnostic downloads or DVDs.
- Download free test suites like
Ultimate Boot CD,
Hiren's Boot CD,
System Rescue CD, or
The Inquisitor.
These run as standalone bootable programs.
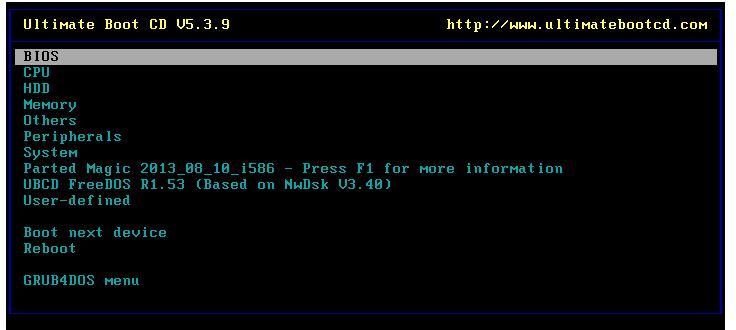
Testing All Computer Components with the Ultimate Boot CD (Courtesy: UltimateBootCD.com)
Don't know if your problem is hardware or software? Run a different operating system. If the problem disappears, it's software.
If you're using Windows, boot a live Linux from USB or DVD to determine whether your problem is Windows or a hardware issue. If you're already using Linux, boot a different distribution as a live Linux to see if your installed Linux is the problem.
What if you computer won't turn on at all? Go to the section Computer Won't Turn On.
What if you computer turns on but won't boot? Go to the section Computer Turns On But Won't Boot.
Okay, let's discuss the most common hardware problems and their solutions --
Computer -- How to Access the Configuration Panels (UEFI/BIOS)
This is the first of several sections that cover key problems that involve your computer as a whole. This first section tells how to access the Configuration or Setup panels.
Fixing many computer problems require that you access the configuration or setup panels. These hold various settings essential to your computer's operation that are stored across sessions. (Your computer has a small battery inside to provide the power needed to maintain these settings when it is turned off.)
These configuration panels are also sometimes called the BIOS, the UEFI, or the UEFI/BIOS panels. If your computer displays the option to Enter Setup while it boots, it's referring to these panels.
The configuration panels provide information on your computer's hardware and devices, allow you to set various operating parameters for the computer and its devices, and supply testing or diagnostic programs.
Here you see all these functions down the lefthand side menu from a Dell computer's configuration panel. This example retrieves details on the computer's video controller:
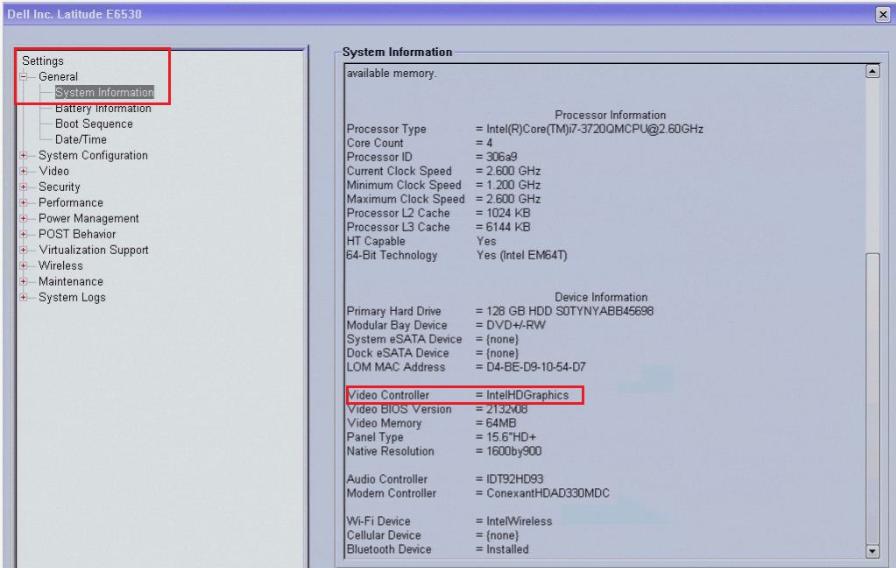
A Sample Configuration Panel Menu (Courtesy: Dell Computer)
Accessing the Configuration Panels: There are several ways to access the configuration panels. The most common is simply to press a PF key while your computer boots.
Unfortunately, each manufacturer has its own "magic key" to enter these panels. And sometimes they change them over time, or by model.
Here are the most common keys. Just tap the appropriate one during startup and you'll enter your computer's configuration panels.
To enter the Configuration or Set Up Panels --
| Acer | F2 or DEL |
| ASRock | F2 or DEL |
| ASUS | F2 or DEL |
| Dell | F2 or F12 |
| ECS | DEL |
| Gigabyte/Aorus | F2 or DEL |
| HP | ESC or F10 |
| Lenovo (Consumer Laptops) | F2 or Fn + F2 |
| Lenovo (Desktops) | F1 |
| Lenovo (ThinkPads) | ENTER then F1 |
| MSI | DEL |
| Microsoft Surface Tablets | Press and hold volume up button |
| Origin PC | F2 |
| Samsung | F2 |
| Sony | F1, F2, or F3 |
| Toshiba | F2 |
| Zotac | DEL |
If you can't get into the UEFI/BIOS with these keys, it won't hurt if you try others. Hit a slew of the above keys during boot and it's likely you'll get in there with one of them.
If you're running Windows 10 or above, you can also access the configuration panels from Windows by going into SETTINGS. Read one of these articles for details on how to do this.
Your computer's documentation also tells how to access the configuration panels.
Finally, it's possible you can't access the UEFI/BIOS because boot timing doesn't allow you a chance to press a PF key. In this case, follow the procedure in the next section to reset your computer to its factory defaults. This resets the UEFI/BIOS parameters to their default (original) state. Now you'll have sufficient time to hit a PF key to enter the configuration panels.
Computer -- How to Clear Configuration Panels Memory (CMOS Memory)
Sometimes you'll want to set your computer back to its factory default configuration.
The easiest way to do this is through the Configuration panels. Every computer has an option to "SET TO DEFAULTS" or similar choice.
You get into the Configuration panels as described in the section above.
If you can't get into those panels, shut down and open up the computer. Newer motherboards may have a "CLEAR CMOS" button. The computer documentation will tell you where it is. Press it for 10 seconds and you're done.
If your motherboard does not have a CLEAR CMOS button, remove the CMOS battery. Keep it out for a couple minutes, then plunk it back in. This will reset the UEFI/BIOS to its defaults for all boards except those rare ones for which the battery is not removable.
Computer -- Unexpectedly Shuts Down
There could be many causes for this one -- a short circuit, damaged electronics, and more. Most random shutdowns are caused by overheating.
Laptops are especially prone to random shutdowns due to overheating because they cram so much circuitry into too small a package for easy cooling.
Every computer has internal sensors that immediately shut down the system to prevent electronics damage if the temperature gets too high. Since you can not relate the timing of the shutdowns to your actions, they appear random.
View Temperatures: View your laptop's internal temperatures by running a free monitoring app. Download SpeedFan or other free monitors for Windows. Use lm-sensors or XSensors for Linux. These tools will also help you verify that your fan(s) are spinning when they should be.
Here's SpeedFan on the left, XSensors on the top right, and lm-sensors on the bottom right:

Monitoring Temperatures with SpeedFan, Xsensors, and lm-sensors (Courtesy: SpeedFan, XSensors, lm-sensors)
Fix Overheating: To fix overheating, ensure all fan(s) are spinning when they should. Unclog the air vents. Make sure you aren't blocking the vents by placing the laptop on your lap or pushing your desktop up against a flush surface. Don't pre-heat a laptop by leaving it in the direct sunlight or in a car window. Use the computer in an air-conditioned room.
Open the computer and remove dust, especially that coating circuitry. Since static electricity kills electronics, don't rub circuitry with a dust rag. Blow out dust with an inexpensive canister of compressed air.
Start up the computer and go into the UEFI/BIOS configuration panels. Some computers will have options there that allow you to reduce CPU speed. Stepping down the speed can reduce heat generation. Or, the configuration panels might allow you to control or increase fan speed. This also reduces heat generation and prevents overheating.
For laptops, you might consider buying a cooling pad. Your laptop sits on top of this and it keeps it cooler. They're only about $25 USD at Amazon or other electronics stores.
Another option may be to replace the fan(s). Fans burn out as their ball bearings fail. Here's how to replace a desktop case fan. It's a simple procedure. You normally just unplug and unscrew the existing fan, then plunk in its replacement. Just make sure you buy a replacement of the right size with a compatible plug.
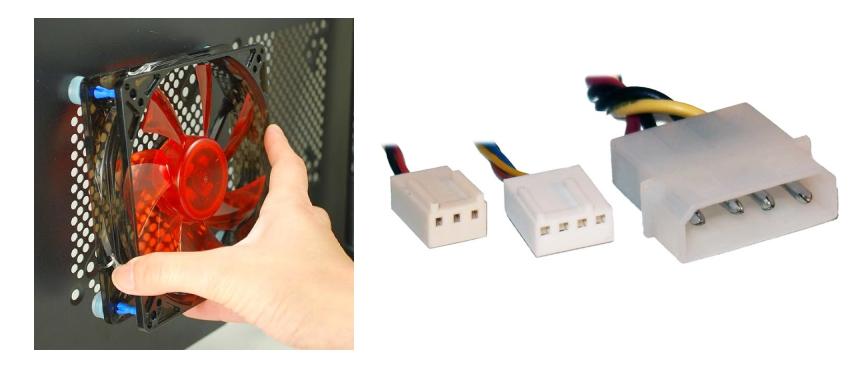
Left: Desktop Fan -- Right: Common Fan Plug Sizes (Courtesy: MoneyExpertSteam.Blogspot.com, PCWorld)
These two photos show how to replace laptop fans. It's pretty easy.

Replacing Laptop Fans (Courtesy: RPM Tech Tips @Youtube, Windy River RR @Youtube)
If it's specifically the CPUs that are overheating, many processors have a CPU heat sink. This is a metal flange of some sort that draws heat away from the CPU chip. Over time, these sometimes become less effective as the glue that binds them to the chip degrades. You may need to "re-seat" the heat sink. In other words, you must remove the sink, put new glue on it, and place it back into position. Here's how to re-seat a CPU heat sink and the CPU. Here are videos on this specifically for laptops.
Anyone who reads the documentation specific to their computer model can perform these procedures so long as they exercise care. You can also find many helpful "how-to's" on Youtube.
Computer -- Turns On But Won't Boot
You flip the Power switch on and your computer appears to start up. The power light goes On, the fans spin, maybe your hear a hard disk start to spin -- but nothing further happens. You can't get into the computer's configuration (UEFI/BIOS) panels to perform problem determination. That means you have a hardware problem.
Beep Codes: Some computers will give you "beep codes" or flash panel lights to tell you what's wrong. Look in your machine's doc to decode them. Or visit this webpage.
Methodology: Without beep codes or other indicators, this one's tough to diagnose. You need a methodology to identify the problem. Here is one that is time-consuming but effective in isolating a defective component. It identifies these problems:
- Improperly seated or burned out adapter cards
- Faulty devices
- Loose or bad connector cables to devices
- Wires that aren't properly connected to the motherboard
- Improperly seated or defective memory sticks
Now you're down to a naked motherboard with its CPU, attached to the power supply. Insert one good memory stick into the first slot nearest the CPU, attach a working display (with a video card you know works, if necessary), and turn on the computer. If you can't access the configuration or UEFI/BIOS panels now, the motherboard or CPU circuitry may be bad. Visually inspect the motherboard for leakage, especially near the capacitors and battery. You might succeed in cleaning up leakage, but most of those boards are goners.
If the system does display the UEFI/BIOS panels, the motherboard and its embedded circuitry is good. One at a time, reattach each connector or cable or insertable adapter card. After reconnecting an item, turn on the computer. If you can still get into the UEFI/BIOS panels, you know that whatever you just attached is not causing the freeze-up or failure. As soon as you attach an item and the computer dies, you know that that component was the problem.
Here's an example. My friend's year-old computer completely baffled him. It would start up, display the "HP Welcome" panel, and freeze. He couldn't get into the configuration panels. I stripped the system down to this:
Motherboard + CPU + One Memory Stick + Display + Power SupplyThen I powered on and got into the UEFI/BIOS panels, so I knew the motherboard and CPU were good. Then I attached each item, one at a time, and booted after each, and got into the UEFI/BIOS panels. Until I attached the disk drive! Then the symptom re-appeared. We replaced the defective disk and the system works fine.
Computer -- Won't Turn On
What if your computer won't turn on at all? Check to ensure that it was it plugged into a live wall socket. Test the socket with a lamp. Don't assume that one socket in a power strip is working just because the other sockets in the strip work. If you just upgraded memory verify the secure seating of the ram sticks.
Desktops: Check the wire that goes from the Power On button to the motherboard. If this doesn't connect you're not turning on the computer at all. Is the power supply (PS) working? Did its fan spin when powered on? Is the PS properly connected to the motherboard? If you have a spare try the motherboard with another power supply to see if a burnt out PS is the problem. Find how to diagnose PS problems here.
Those who regularly work with electricity may have a volt-ohm meter (VOM) to verify the current.
If you don't have that, you can use the paper-clip trick to test the power supply. Caution: be careful, if you perform this procedure it is strictly at your own risk.
Here's how to do it. Unplug the computer from the wall socket, and flip the OFF button on the power supply (if it has one). Unplug all the PS power leads.
Find pin 14 (the green wire) and connect it to any black wire (which is Ground). Bend a paper clip to connect the two. Ensure the clip touches nothing else so you don't cause a short.
Now plug in and turn ON the power supply. If the fan starts up, your PS appears to be functioning.
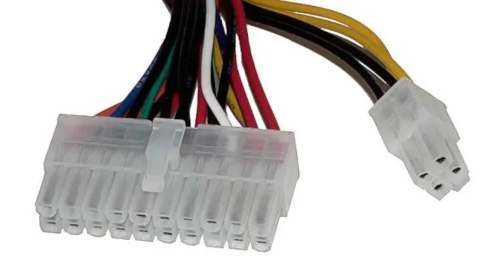
Connect Green Pin 14 to Black Ground Pin with a Paper Clip (Courtesy: David L. Farquhar)
Never open up your power supply to try to fix anything inside it! Unless you are a professional electrician this could be dangerous.
You can also try the disassembly/reassembly procedure in the section "Computer -- Turns On But Won't Boot" above. Sometimes you'll find a short caused by improper connection this way.
Replace Desktop Power Supply: If you need to replace a dead power supply, this is easy to do for desktop computers. Their power supplies directly attach to the case with a few screws. They plug in to your motherboard with a special connector (shown in the photo below as the long white plug in the foreground.)
Then they attach to various devices through their power cables and black connectors. (Computers that are very old used to have white plugs to connect to the disk drives instead of the modern black ones shown.)
Desktop power supplies come in several standard sizes and power ratings. Make sure you buy one of the right size, and with the proper connecting plugs for your motherboard and all your devices.

A Typical Desktop Computer Power Supply (Courtesy: Ebay)
Laptops: Try your laptop with the power cord. (You may have just experienced an unexpected battery fail or drain.)
You may have to replace what many people call your "power cord." Actually, this is a power adapter with a cable or two that connect it to your laptop and a wall socket.
Power adapters vary by manufacturer, and sometimes by model as well. They're not usually standardized. Thus you have to google to find compatible items for your specific laptop. Sometimes you can reduce your cost by buying from a third-party vendor instead of the original laptop maker. Or you may be able to buy a generic adapter that fits many laptops. Just make sure that whatever you buy is labeled as compatible for your laptop model. It has to be both electrically compatible and physically compatible with the female plug receptor on the laptop.
Computer -- Boots into Windows But Fails Somewhere Along the Way
If the computer boots and gets into the Windows start-up process, then freezes or fails, nearly always you have a Windows software issue rather than a hardware problem.
To find out for sure, boot a live Linux from USB or DVD. If Linux boots and works you have a Windows problem. This is a hardware article so unfortunately I don't have anywhere near the space to cover how to fix Windows software... it's a huge topic. I'm sorry but you'll have to do some googling.
Computer -- Loses the Date or Time
If your computer loses the date or time across sessions, you probably have a dead battery. This is the little round watch-type battery that keeps configuration information across sessions, the CMOS battery.
Before you replace the battery, write down any unique configuration information you've entered into your UEFI/BIOS panels. Because this procedure will erase it, and you'll need to know it to re-enter it later.
After you've totally shut down your computer and disconnected it from the electrical socket, open it up, then pry out the battery and replace it. They cost only a few bucks. Most computers use the battery shown, a CR2302.
After you install the new battery, update the date and time and re-enter any unique configuration info into the UEFI/BIOS. Here's how the battery might look on a desktop's motherboard:
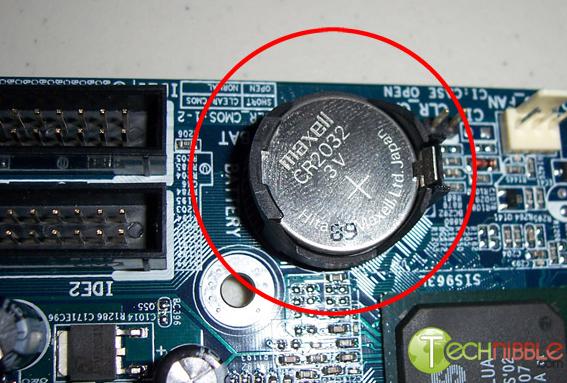
Computer Battery on the Motherboard (Courtesy: PCTechNotes.com and TechNibble.com)
Computer -- Is Noisy
As computers age, they often make more noise. Sometimes this gets to the point where it's annoying. Here's how to fix this.
In most cases, the cause of the noise is the one or two fans inside the computer. Maybe they're having to work more than they used to because your computer is cluttered with dust. Or, maybe their spinning itself is causing more noise.
First, make sure you're not blocking the computer's fan(s) or air holes by where you've positioned it. Then clean any dust out of the fans or aeration holes from the outside.
Next, ground yourself, and open your computer. Clean dust out around the fans, near the central processor, and from all internal surfaces. Remember that you can't rub circuitry without risk of damaging it, so you may want to use a can of compressed air for this. Be sure to blow out the power supply and its fan with the compressed air.
Close up the computer and see if that solved your problem. If not, listen closely to the fan(s) themselves. If their spinning is the issue, sometimes you can apply a very tiny drop of lightweight mechanical lubricant oil to the fan shaft. You want to be careful not to apply too much oil, or you could pollute the inside of your computer. So apply the tiniest drop you can.
The safest way to do this is to remove the fan from the computer, apply the oil, then spin the fan a bit to ensure you didn't put too much oil in there. That way you can spot and wipe up any excess.
In this photo, you'd just peel off the sticker in the middle of the fan to expose the shaft. That's where you'd apply a tiny oil drop:

Where to Oil a Noisy Fan (Courtesy: bhPhotoVideo)
You may just find it easier to buy and install a new fan. They cost less than $20 and only require a screwdriver to install. Measure your current fan first to ensure you buy the right size. Also, be sure you buy one with the same connector plug as the one you're replacing. Replacing a laptop fan isn't any more difficult than replacing one in a desktop.
Laptop users sometimes buy a cooling pad to reduce how often their fans spin. And be sure not to leave your laptop in direct sunlight or inside your car and heat it up before you use it! If you do, you ensure your fans will spin to the max to keep the machine cool enough to operate.
Finally, there is the special case where a desktop computer's power supply is the source of unwanted noise. First off, blow accumulated dust out of its enclosure with compressed air.
Second, you might find that some other internal component is rubbing against or interacting with the power supply to cause noise. Inspect inside the case for this. And check to see if the power supply is still securely mounted. Screw it in tighter if it isn't.
If your desktop's power supply is making a buzzing noise, it might be that its fan has worn out its ball bearings. In this case just buy a new power supply. Be sure to measure yours first to ensure you purchase an appropriately sized replacement. Also, be sure it has the motherboard and device connectors you require. (Find more about power supply problems here).
You should NEVER open up your power supply to try to fix anything inside it. Unless you are a professional electrician this could be dangerous.
Computer -- Got Wet
Oh, no! You spilled your drink on your desktop keyboard. Or worse, all over your laptop! Is this recoverable? Usually it is.
First: turn off everything off immediately. Pull the power cord or push the OFF button.
Do not take the time to perform a graceful shutdown! The longer electricity goes through the electronics the greater the chance for permanent damage.
Do not touch or move the device. Wait a full day or even two to ensure everything has completely dried out. Then, turn on the system. If you're lucky it will work.
Sometimes people are impatient and want to speed up the evaporation process. If you can point a fan at the affected device it may help. I don't recommend toweling it down or blowing at it with a hot hairdryer as these can cause further problems if you're not very careful and knowledgable about what you're doing.
Simple evaporation doesn't always do the trick, but I've picked up computers left out in the rain or snow for days, let them dry out, and used them without any ill effects. Just dry them out completely before powering on.
If you spilled a drink on your keyboard, it may be sticky. Get it back in working order with the instructions in the section on keyboards. If you spilled water, don't bother. Just let it all evaporate.
Mouse Problems
Problems with mice usually come down to one of three fixes: cleaning the mouse, fixing wired mouse problems, or fixing wireless mice.
Cleaning: With optical mice, the only cleaning you need to do is to ensure that no lint is clogging the optical opening beneath the mouse:
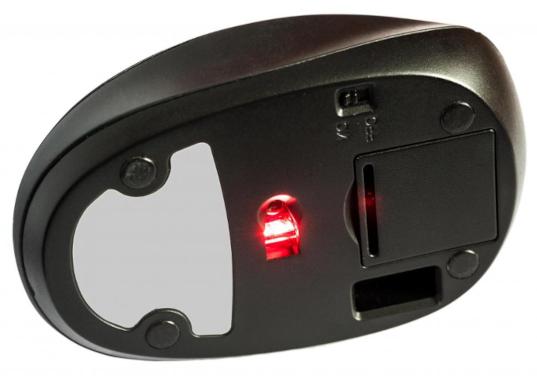
Clean Any Lint Blocking the Light From the Mouse (Courtesy: WiseGeek.com)
Sometimes optical mice don't track well on glossy or transparent surfaces, including some mouse pads. Verify this by trying the mouse on a different surface.
For all mice, verify the operating system is using a valid mouse driver. Test your questionable mouse on another computer or try a different mouse with your computer. Reboot and test. This shows whether you have a dead mouse rather than a software issue.
Wired Mice Problems: If you have a wired (plug-in) mouse that doesn't work, ensure the connection is secure. Most mice plug into any USB port, so ensure that port is working, or try a different port. Should you have a very old round mouse port (a so-called "PS/2 port"), make sure that the mouse is plugged into your mouse port and not the keyboard port.
Wireless Mice Problems: Wireless keyboards are subject to many of the same potential problems as wireless keyboards:
- Always check the batteries first. This is the most common problem. Either replace or recharge the batteries.
- Check and verify the device driver
- Ensure the switch underneath the mouse (if any) is turned ON
- Resync or "pair up" the mouse with the computer. Usually you accomplish this by momentarily depressing a tiny button on the bottom of the mouse. (Note that some mice don't require pairing.)
- If the mouse uses a dongle, ensure the dongle is securely plugged in. You might try changing its port to see if that helps. If the resync or "pair up" button is on the dongle, be sure to press it to resync.
- If the mouse uses Bluetooth communications, ensure that Bluetooth is installed and enabled on the computer. Verify this by testing a different Bluetooth device, if you have one.
- For some mice, ensure that they're within signal range and that signals are not physically blocked from line-of-sight. Some old mice only have an effective signal range of about 6 feet (two meters).
- Ensure that there is no wireless interference by turning off any other nearby wireless devices
- If you have another mouse, try it with your computer to see if it works. If it does, you know that your problem is your mouse, not your computer. Conversely, try your "problem mouse" on another computer to see if it works there. If it does, you know the problem is on the computer, not your mouse.
- When you're in the midst of resolving wireless issues, it can get confusing. Sometimes an operating system reboot is a simply way to reset everything and start from ground zero.
Keyboard Problems
Problems with keyboards usually come down to one of three fixes: cleaning the keyboard, fixing plug-in keyboard problems, or fixing wireless keyboard issues.
Cleaning: If you prevent food, hair and other debris from falling inside your keyboard, you've avoided 90% of all problems. But even if you're careful, you may find that over time some keys begin to stick or don't operate well.
To clean a desktop keyboard, detach it, turn it upside down and vigorously shake it. You can do this, too, with your laptop, but be a little more careful with the shaking, since you're shaking your entire computer.
If this doesn't do the trick, make sure your computer is turned off. Then carefully pry off sticky keys and eliminate the gunk underneath. You can easily pop the keys off with a penknife. After you clean underneath them, just push them back into place. Keys will often make a little snapping sound so that you know you got them back into place properly.
Here's how a keyboard looks with a key or two popped off. Be sure to carefully clean out all the grit you find.
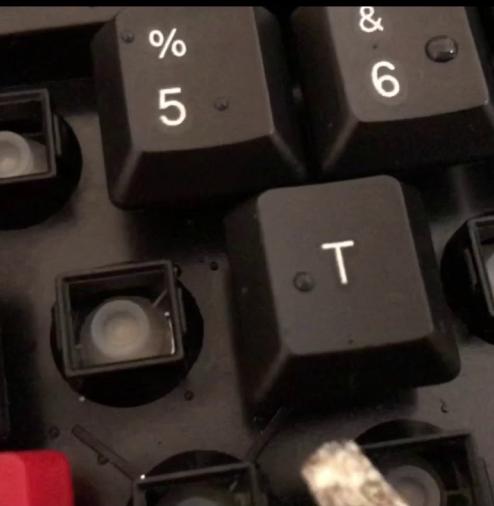
Popping Off Keys to Clean a Keyboard (Courtesy: MORAZI LoL at Youtube)
Cleaning the keyboard with rubbing alcohol or electronics cleaner can help, too. Especially if you spilled a drink over the keyboard, and it's become sticky.
Desktop keyboards are so cheap you might as well buy a new one for all but the simplest repairs. Laptops are another matter, with their embedded keyboards. You don't want to trash your entire laptop due to a keyboard problem.
Here's a good article on repairing laptop keyboards. And here are several instructional Youtube videos. Hiren's Boot CD includes free keyboard testing programs.
Though it might sound challenging, anyone can replace a laptop keyboard if they exercise due care. Just find the instructions for your particular laptop model on the web. They're all a bit different so it helps to have model-specific instructions. And of course, you need a replacement keyboard for your specific model laptop.
If your issue is that you spilled on your keyboard, follow the instructions in the section "Computer -- Got Wet".
Wired Keyboard Problems: If you have a wired (plug-in) keyboard that doesn't work, ensure that the keyboard plug is securely plugged in. Most keyboards plug into any USB port, so ensure that port is working, or try a different port. Should you have a very old round keyboard port (a so-called "PS/2 port"), make sure that the mouse is plugged into your keyboard port and not the mouse port.
Wireless Keyboard Problems: Wireless keyboards are subject to many of the same potential problems as wireless mice:
- Always check the batteries first. This is the most common problem. Either replace or recharge the batteries.
- Check and verify the device driver
- Ensure the keyboard switch is turned ON
- Resync or "pair up" the keyboard with the computer. Usually you accomplish this by typing some specific key or key sequence on the keyboard. (Note that some keyboards don't require pairing.)
- If the keyboard uses Bluetooth communications, ensure that Bluetooth is installed and enabled on the computer. Verify this by testing a different Bluetooth device, if you have one.
- If the keyboard uses a dongle, ensure the dongle is securely plugged in. You might try changing its port to see if that helps.
- For some keyboards, ensure that they're within signal range and that signals are not physically blocked from line-of-sight
- Ensure that there is no wireless interference by turning off any other nearby wireless devices
- If you have another keyboard, try it with your computer to see if it works. If it does, you know that your problem is your keyboard, not your computer. Conversely, try your "problem keyboard" on another computer to see if it works there. If it does, you know the problem is on the computer, not your keyboard.
- When you're in the midst of resolving wireless issues, it can get confusing. Sometimes an operating system reboot is a simply way to reset everything and start from ground zero.
Memory Errors
This section and the next cover memory errors and how to install new memory into your computer.
Memory errors are easy to fix. Simply remove and replace the bad memory stick.
The problem is identifying that you have a memory error, since many are transient (they occur sporadically). If you suspect a memory problem, run an intensive memory checker utility like that in the Ultimate Boot CD, Linux's Memtest86, or Hiren's Boot CD. Take the time to run the long or extended test (not the short or quick test). Sometimes it's most convenient to let a long test run overnight.
You can also set the UEFI/BIOS to test the memory upon startup at the expense of a longer boot. This test will not be as thorough as Memtest86 or Hiren's.
Read the section below to learn about how to acquire memory that will work in your computer.
Memory -- How to Add More
Do you need more memory? Will your computer work faster if you add some? Or do you need to replace a faulty memory stick?
For a Windows computer, the Control Panel can lead you to how much physical memory you have installed. Then check the Task Manager and Performance Monitor to see how much of that memory is being used. For Linux, check the equivalent tools, such as HardInfo System Information, the GNOME System Monitor, or Conky.
Check memory usage when the computer is idling, and also when it's performing the tasks you typically do. High usage indicates your system might benefit from adding memory.
To add memory to your computer, shut down your computer and take a look inside. You'll see if you have available slot(s) into which to insert additional memory sticks. You can also read the labels on your existing memory to see what kind of memory will work. But those labels are often confusing.
An easier way is to use the online "memory finder" tools provided by various memory vendors. You just enter the manufacturer and model of your computer and the online tool burps back which memory sticks will work in your PC. (You don't have to buy anything to use these free tools.)
Before you buy memory, ensure that you know what the maximum allowable memory is for your computer hardware. The Kingston and Crucial tools will tell you this, or else check the vendor's literature that came with your computer, or look up its specifications online. You don't want to insert a new memory stick into your computer only to find that your machine won't fully utilize it!
When you add memory into your computer, ensure it's seated correctly before booting. If the memory stick doesn't fit one way, try it in the other direction. Memory sticks have a little notch that has to line up with the motherboard.
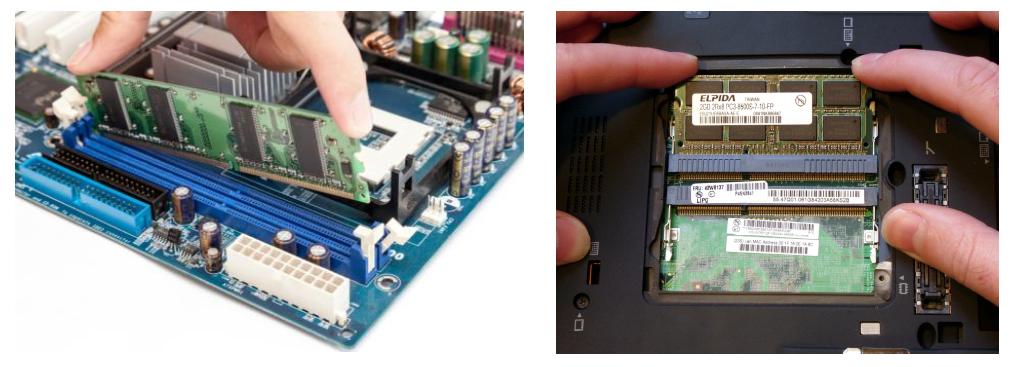
Inserting a Memory Stick (Left: Desktop, Right: Laptop) (Courtesy: bleuwire.com, TechRadar)
If the memory is not inserted properly most computers will beep and refuse to boot, telling you to re-seat. Hopefully no damage resulted.
After adding memory, always enter your UEFI/BIOS configuration panels on your next boot to ensure it's properly recognized before booting all the way into your operating system.
Memory Compatibility: You need to make sure any memory you add will work in your computer. If you use the Kingston or Crucial memory finders above, you're golden. Otherwise you should know:
- All memory sticks have a small notch on them.
- If the stick's notch allows it to fit into your computer, it is very likely it will work with your computer. But there are exceptions. The only way to know whether some random memory stick will work is to try it. Trying won't hurt anything as long as the memory stick physically fits into the computer.
- If you mix different speeds of memory, it's very likely your memory will operate at the speed of the slowest stick you've installed.
- Different manufacturers' memory usually works together fine -- again with a few exceptions.
- Only after checking the Configuration panels (the UEFI/BIOS) can you be sure all memory you've installed on your computer is recognized and working properly.
This photo shows the tiny notches at the bottom of memory sticks. These define different memory generations. Only if the notch aligns with the motherboard slot will the memory fit into the computer. (Tip: be sure to try inserting the stick in the opposite direction if your first try doesn't work.)
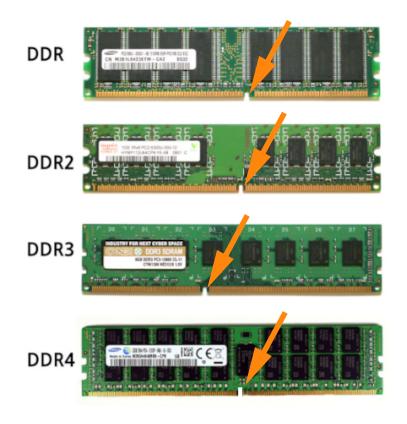
Notch Locations Define Different Memory Generations (Courtesy: myxxgirl.com)
USB Memory Stick Problems
USB memory sticks go by several names. Some call them pen drives or thumb drives or flash drives. They're all the same thing. This section covers how to fix problems, while the next section tells how to speed up USB thumb drive data transfer.
==> If you store important data on your USB memory stick, you should be sure to run backups for it, just the same as you would for your regular internal disk drive.If the computer seems not to recognize the pen drive at all, try plugging it into a different USB port. If that works, it means the first port you tried is either dirty or non-functional. With the computer off, you can try cleaning that port with a can of compressed air. Carefully clean the contacts on the USB memory stick as well.
If that doesn't fix the problem, you can go farther in the cleaning by using a dental tip and isopropyl alcohol.
You should also verify you have an up-to-date driver for your USB ports.
You could get any of several different error messages from your operating system indicating that the USB stick has suffered software corruption. In this case, run the operating system's check disk or repair utility on the USB stick. (Treat the file system on the USB memory stick just the same as any file system that resides on an internal disk drive.)
You might, alternatively, reformat the USB flash drive. Of course, this will lose any data stored on the USB stick.
As far as hardware failure goes, USB flash drives are designed to handle partially failing portions. This is transparent to you as a user -- you'll never even know it's happening. However, thumb drives do some day reach a point where they catastrophically fail. This often appears sudden to the user. This is why you always back up any data on your USB memory stick that you don't already have a copy of elsewhere.
How about opening up the USB stick to fix it? Just as with a power supply or a hard disk drive, this is usually a bad move. There's nothing to fix inside there... it's just a chip.
USB Memory Stick is Slow
It's not unusual to find that copying or backing up a large amount of data to your USB thumb drive or pen drive is slow. Or that it becomes slower over time. Here are some fixes.
First, understand that there are several standards for USB transfer speeds. As this chart shows, if you can use the latest technology, you can vastly speed up your USB data transfers:
| Introduced: | Standard: | Max. Speed: |
| 1996 | USB 1.x | 1.5 to 12 Mbit/s |
| 2001 | USB 2.0 | 480 Mbit/s |
| 2008 | USB 3.0 | 5 Gbit/s |
| 2013 | USB 3.1 | 10 Gbit/s |
| 2017 | USB 3.2 | 20 Gbit/s |
| 2019 | USB 4 | 40 Gbit/s |
| 2022 | USB 4 v2.0 | 80 Gbit/s |
Maybe a graph shows the speed differentials better:
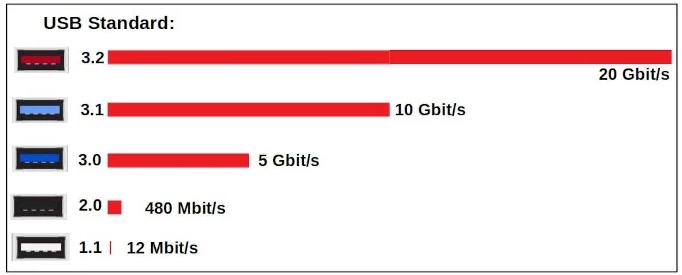
The Difference in USB Thumb Drive Speeds is Dramatic (Courtesy: H. Fosdick at OpenSource)
(Not every vendor always uses these color codes to denote USB port speeds. It's best to refer to your hardware documentation or your operating system's hardware information panels to see what your port speeds actually are.)
To get the fastest USB data transfer speeds, you need to make sure that your USB port and the USB thumb drive you stick into it are rated for the same speed.
If either the port or the USB stick is slower, data transfer will occur at the slower speed.
If the USB pen drive is slower, just buy a faster new one. They're cheap.
Or if the port is slower, you can buy an inexpensive "port card" for under $20 USD.
Keep in mind that USB pen drives do slow down over time, especially under heavy use. Sometimes it pays to replace an old stick with a newer one. And there are differences in speeds between brands. Their internal firmware varies.
Re-format the Drive: Formatting a thumb drive can optimize its speed. By default, many people format their pen drives with FAT32 or exFAT. These choices are compatible across all operating systems but do not optimize data transfer speed.
For Windows, to optimize speed format the pen drive to NTFS. Then, under Device Properties -> Policies for the thumb drive, you can choose Better Performance instead of the default for Quick Removal.
With Linux, you can check the data transfer speed of your USB port/thumb drive combination in the same way you check disk speed. For example, through the GNOME Disks program. This tells you what speed you're getting.
For formatting the Linux pen drive, ext2 doesn't support journaling and therefore writes less data. But I've personally not noticed any speed difference between ext2 and ext4 filesystems.
Alter Caching: Some people find that altering Linux's caching behavior helps data transfer. You can get a quick verification whether this will help by disabling the write cache for the USB device:
1. Determine device name with fdisk line command
2. Disable the write cache for that device by this command, where X refers to the specific device: sudo hdparm -W 0 /dev/sdX
2. Disable the write cache for that device by this command, where X refers to the specific device: sudo hdparm -W 0 /dev/sdX
This command only pertains to your current session. As further discussion becomes pretty technical, see this article for more information.
USB -- How to a Create "Live USB" to Boot Your Computer
When diagnosing and fixing computer hardware, it's essential to be able to boot and run an operating system from a USB thumb drive. This allows you to work on the computer without the need to have a working operating system residing on that computer's disk.
You can create a bootable USB drive using any of several free programs. This section tells how to create a Live USB to boot whichever Linux operating system you like, or also for booting standalone diagnostic programs like the Ultimate Boot CD or Hiren's Boot CD.
First, verify that your target computer has booting from USB set to enabled. You can find this setting in its Configuration panels. Also check that the USB drive is listed as the first or default boot option. You may also need to set SECURE BOOT to OFF.
While there, you'll want to determine whether the the target computer uses the newer UEFI firmware or legacy BIOS firmware. You must match this setting between the target computer and the Live USB you create. Otherwise the computer may not boot off the Live USB. Modern computers and USB creation software all default to UEFI.
Next, download the Linux version (or "distribution") you wish to boot. It will be a single file of the file type .iso. You'll also need a USB memory stick of sufficient size to hold that file. (This operation will destroy all existing data on the USB thumb drive.)
Now download and install a program to create your Live USB. If you use Windows, Rufus is a good free program. It's an executable file (.exe) so you needn't go through an install process. Another good option is the Universal USB Installer (aka UUI).
Plug in your thumb drive, start up Rufus or UUI, and fill in its panels to create your Live USB.
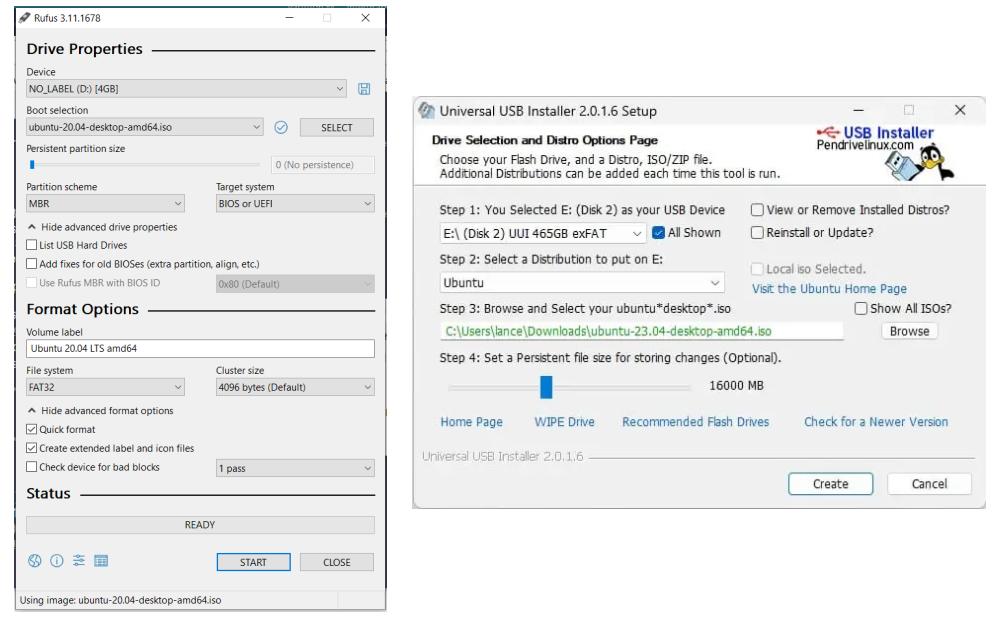
The Rufus and UUI Main Screens (Courtesy: Rufus and PenDriveLinux)
Rufus and UUI are Windows-only, so if you run Linux you'll use a tool like GNOME Multi-Writer, KDE ISO Image Writer, or UNetbootin. UNetbootin also runs under Apple macOS.
Live Boot Fails: Usually your Live USB will boot fine. But sometimes it won't, and when it doesn't, you don't get an error message to help diagnose the problem. Instead, you just face a dead computer that didn't boot.
First check that the USB port you plugged into works (plug some other device into it and see if it's recognized). If you can, boot your computer and then plug your USB into another port just to see if you're computer recognizes it as a valid thumb drive. You want to determine if either the USB port you used or the USB memory stick are dead.
If both the port and USB memory stick are good, enter the target computer's Configuration panels. Verify that USB Boot is enabled, that the USB drive is listed as the first or default boot option, and that SECURE BOOT is OFF.
(Note: really old computers sometimes don't support Live USB booting. You may have to use Live DVD booting instead.)
Next, verify that the parameters under which you created your USB live boot drive match those same parameters in the target computer's Configuration panels. Specifically, both must agree on the boot firmware (either newer UEFI or legacy BIOS). If both the USB stick and the computer don't agree on which firmware to use for the live boot, it will fail.
It's unfortunate, but when you're in your computer's Configuration panels, vendor terminology varies. Some computers will refer to UEFI versus BIOS booting. Others label UEFI booting as Default booting and refer to legacy BIOS as Enable booting from legacy devices or Enable booting from non-UEFI devices. Still others have an option called Compatibility Support Module or CSM. If that's enabled, it means you're performing a legacy BIOS boot.
The bottom line is simple (even if the terminology gets confusing). You want both your Live USB and the target computer's Configuration Panels to agree either on UEFI or BIOS booting. Modern computers have all used UEFI for some years, but you could still run into this problem on older machines.
Many USB-creator tools don't tell you whether the Live USB you created is UEFI or BIOS. Look at the panel for the Rufus creator program above, and you'll notice that it allows you to specify these two parameters. But many USB creator tools do not. So how do you know what you created?
The best answer is simply to try booting the Live USB and see if it works. Beyond that, you can look at the files on the Live USB you created. If they include a folder named UEFI, you can assume you better set the target computer's Configuration panels to boot from a UEFI Live USB.
One other possible point of incompatibility. Disk drives (and Live USBs) can be formatted to either the legacy MBR standard or the current GPT standard. You need your Live USB to use a standard your computer will understand. Your operating system's disk inspection tool can tell you whether the USB stick is GPT or MBR. GPT is the current standard, yet nearly all computers will accept legacy MBR format as acceptable for a USB thumb drive.
Display Screen -- Pixels Get Stuck or Die
Display screen problems divide into two areas. I discuss here how to revive pixels that have failed, while the next section tells what to do when a display dies entirely.
When one or more pixels fail, either of these situations can occur:
- Gets "stuck" displaying something and won't change
- Falls dark or "dead" and doesn't display anything at all
First, identify which pixels are stuck by viewing your display with different color palettes.
Next, run a pixel-fixing program. You can find free ones by googling. JScreenFix is a useful one.
These programs will flash various palettes and lights to your screen. Usually they do the job, although you may have to run it more than once to get your fix.
If the pixel is still stuck, you can gently apply pressure to it to fix it. Be but very careful with the pressure, and be warned -- do this wrong by applying too much pressure, and you can actually make the problem worse.
To perform this procedure, first open a dark background in your display or within your browser. You need backlit pixels to work with.
Then, with a stylus or touchpen or microfibre cloth, gently apply a little pressure to the affected area. Press the stuck pixel and massage it for a few seconds, then release pressure. You may have to try this a few times for it to work. Don't press too hard or you could damage the display.
Display Screen -- Dies Entirely
When your desktop display dies, always ensure first that you have a good device driver and don't have a software issue that you could fix. And of course double-check that it's plugged in properly to a live power source.
Most LCD displays die due to a failed capacitor. This is a $5 part so replacing it is very cost-effective. All you need is a soldering tool set and a new capacitor.
Starting by watching some instructional Youtube videos. Anybody can do this but you want to understand the process and what's involved.
Sometimes people ask: Isn't it dangerous to open up a monitor? The answer is that opening those fat old CRT style monitors could be very dangerous. They could store a big electrical charge. That's not true of modern LCD displays. They present only the same dangers as opening up your computer -- as long as they're turned off and not plugged in, and you've grounded yourself, tinker away.
Laptops displays are a very different story than desktops. With laptops you have to either fix the display or else trash your entire computer. Fortunately, it's easy to buy a replacement screen for your specific laptop model and install it. There's no soldering involved.
Here are some Youtube videos showing how to replace laptop screens. Anyone can successfully replace laptop screens and keyboards. Just be sure to access model-specific documentation and follow it carefully.
Disk Problems -- All Disks
Your computer's disk is either a solid state drive (SSD), or a hard disk drive (HDD). They both have their own unique ways of failing, but let's start with some common issues. In subsequent sections, we'll cover problems unique to solid state disks, problems unique to hard disks, how to add internal SATA disk drives, how to add internal M.2 disk drives, and how to completely erase disk drives.
First off, how do you know if you have a disk error? You probably got a read or write error indicating this. If you're questioning, try:
- Run the operating system's disk checker or filesystem checker utility. This tests the file system you are accessing on the disk (not the disk drive itself).
- Run the operating system's disk drive utility to check the disk drive itself.
- Download the disk drive manufacturer's free drive-specific diagnostic program. This will identify any problems. Some can mark off bad disk sectors and even fix disk errors.
- Most UEFI/BIOS's have drive diagnostic and test procedures.
These may not be as thorough as those you download from the
drive manufacturer, but they're still worth trying.
Disk errors are caused either by (1) software or (2) hardware.
If your disk error is due to software issues, this section should enable you to fix it.
If your disk error is due to hardware, easiest solution is to buy a new disk. Disks are inexpensive these days. Then transfer your data from your backup to your new disk.
Messing with faulty disk hardware is not worth your time. The sole exception is if you've failed to back up your data. Then -- assuming your data is important to you -- you've put yourself into a pickle. We'll try to help you get your data back in this section, but success can not be guaranteed.
So the lessons here are:
==> The best insurance against disk drive hardware failure -- by far -- is good backups!
==> Be sure to back up both (1) your data and (2) the operating system and your applications
A few generic rules of thumb for fixing drives:
- Never open the drive enclosure. It is sealed to remain dust free and you can't fix anything in there anyway.
- Heat messes up disks just the same as it harms the rest of your computer's components. Make sure your computer is not running too hot, and that the disk gets proper ventilation. See the section Computer -- Unexpectedly Shuts Down for tips on how to cool your computer.
- If you're really desperate to get your data back, and you didn't make a backup, you might be able to retrieve your data by sending the drive to a data recovery service. They're usually expensive. Just google for "disk drive data recovery services." But continue with all our tips first, before shelling out money you may not need to spend.
In all cases, you'll always want to ensure that:
- Both data and power cables are securely attached to the drive.
- If it's a "stick drive" that resides on the motherboard (an M.2 form factor drive), ensure it's properly and solidly seated.
- The disk is properly defined and recognized in the computer's UEFI/BIOS Configuration panels.
- You've scanned for viruses and ensured your computer has no malware on it.
- You're running the latest available driver for your disk drive.
- You're running the latest firmware available for your disk drive.
Here are common disk symptoms and how to fix them:
"Operating System Not Found"
When booting your computer, you might get an error message like one of these:
- "Operating System Not Found"
- "No Operating System on Disk"
- "Missing Operating System"
- "Invalid Partition Table"
OS Detects the Drive But You Can't Access Your Data
Sometimes your operating system knows a drive is present but won't let you use it. Or it tells you the drive needs to be formatted. Or maybe it just shows a blank drive that doesn't contain any data. Or it won't show you the drive properties or let you format it. Usually this means a software problem: filesystem corruption.
You can usually fix a filesystem to recover all or nearly all of your data. Or, you may have a situation where you can't fix the broken filesystem, but you can recovery your data into another disk.
Here is a quick list of fix/recovery tools (with more here):
| Filesystem: | Free Repair Tools: |
| FAT32, VFAT | TestDisk, PhotoRec, Disk Digger, Linux dosfsck utility |
| NTFS | Lots of free and shareware tools here, Ubuntu's tools, DTIDATA's tool, TestDisk, PhotoRec |
| ext2, ext3, ext4 |
Use Linux utilities like fsck, e2fsck, ddrescue, TestDisk, or PhotoRec |
For instructions on how to use any of these tools, just follow the links provided. This example screen shows the TestDisk utility menu:
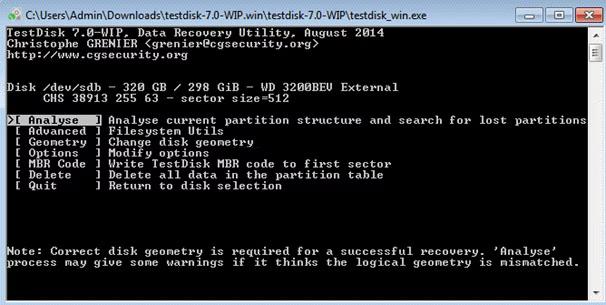
TestDisk in Action (Courtesy: TestDisk @CGSecurity.org via Recoverit.Wondershare.ae)
Here's GNU ddrescue at work recovering data sector by sector, as displayed by its graphical interface, ddrescueview:
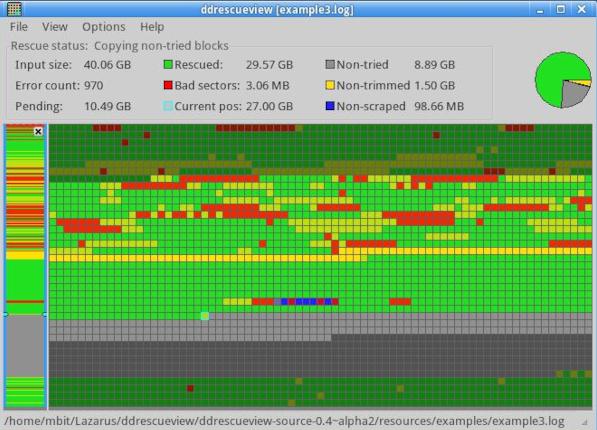
ddrescueview Showing Sector Recovery in Action (Courtesy: ddrescueview)
Drive is Not Detected At All
First make sure that drives have fully connected power and data cables. You could get a variety of errors from this but "drive not detected" is common. Check the data cable connection to the motherboard as well as the side that connects to the back of the drive.
Sometimes for laptops, you'll have a replacement drive you've stuck in that is not quite as thick as the original drive. If the drive is a tad thinner, it may not make sufficiently flush contact with the flange plugs inside the computer.
You can fix this by making the drive thicker. Just take a plastic card (like an old credit card) and tape it to the bottom of the drive. This can increase its thickness to the proper height. Now the drive fits snugly into its enclosure and the laptops contacts are snug and tight for reliable use.
For HDD's, another cause of "drive not detected" problems is a failed logic card on the drive. This is the circuit board attached to the underside of the drive. The board circuitry may fail over time due to the heat coming off the drive and the temperature differential from the powered-off state.
Take off the drive's circuit board and replace it with another. You can buy one on the web or take one from another drive. The key to success is that the logic board must be for the exact same drive. If not, it will not work. Obviously, you'll only go to this trouble if you really need the data on the drive and have no backup.
Disk Problems -- Solid State Disks (SSD)
Read the above section that explains how to fix many kinds of disk drive issues first.
For solid state drives, sometimes a simple reformat will solve your problem. Of course, this destroys any data in the partition you reformat.
Another trick is the power cycling method. It may help you fix a SATA-connected SSD, often without deleting its data. It's particularly helpful when you suffer a power loss and your SSD doesn't work afterwards.
Here are the steps for a desktop computer:
- Power down the computer completely, open the case, and ensure you're grounded.
- Pull out the SATA data cable from the disk drive but leave the power cable plugged in.
- Restart your computer and enter the configuration panels (the UEFI/BIOS panels).
- Stay in the configuration panels for a half hour. Just let your computer idle.
- Shut down the computer.
- Unplug the power cable from the SSD for a minute or two.
- Insert both SATA data and power cables into the drive and reboot.
What if you're working with a laptop? In this case, you can't independently unplug the data cable (since it's hidden inside the laptop). Take the SSD out of the laptop, put in a desktop, and perform the power cycle procedure there. Or, if you have an USB SATA adapter, you can use that. It will work as long as it’s possible to plug in just the power cable.
For "stick drives" that reside on the motherboard (M.2 form factor drives):
- Turn on the computer and enter the UEFI/BIOS Configuration panels.
- Let the computer idle while in the Configuration panels for a half hour.
- Then power down.
- Pull out the power plug and then depress the power button for 30 seconds when shut down. This drains any residual power left in the system.
- Start up the computer and go back into the Configuration panels to idle for another half hour.
- Power down. You're done.
Here and here are more detailed articles on SSD procedures if you need them.
Disk Problems -- Hard Disk Drive (HDD)
Read the above section that explains how to fix many kinds of disk drive issues first.
This section covers problems specific to traditional hard disk drives (HDDs) because these involve the mechanics of a spinning storage media accessed by a disk arm.
HDD Makes Clicking Noises
This problem is unique to hard disks. It is the so-called Click Of Death. Drives make clicking noises when they have to move the disk arm multiple times to retrieve data. The drive is not functioning properly and this is its error correction procedure. Your drive may fail very soon! Copy any data you need off there immediately. You may have limited time so copy files in priority order.
If you can not get in to copy data off by normal means, here is a procedure that extracts data from even the most recalcitrant drives. It's more detailed than I can describe here but the key steps are:
- Hook up a second target drive to the controller (or you can use a USB thumb drive as the target)
- Use the ddrescue command to
copy the raw drive image from the failing drive (instructions here)
- Make the target partition active so you can access your recovered data
HDD Not Spinning
Another problem for hard drives only. If the drive is not spinning, most people assume it is dead. Usually, but not always. I've read about supposed home remedies like freezing or hitting the drive. But if you really must retrieve your data from that drive, don't mess with it! Instead, pay a professional data recovery service, like Data Savers or Ontrack. They often succeed because they ignore the drive hardware and instead directly analyze its storage media.
Bad HDD Contacts
It's possible to have a HDD hardware problem that shows the same symptoms as a filesystem or disk software issue. Dirty contacts on the underside of the drive enclosure are one cause. This article has photos that lead you through how to clean the drive contacts simply by rubbing them with a pencil eraser.
Disk Problems -- How to Add an Internal Disk
There are two basic ways to add an internal disk drive to your computer: the traditional SATA interface, and the newer and faster M.2 interfaces.
Add SATA Drive: Let's start with the traditional SATA interface for a desktop computer. The lefthand photo below shows the two cable connectors that attach to the back of the SATA disk drive. The wider black connector in the back of the disk connects to the power supply. This provides the power the disk requires.

Left: Connecting a SATA Disk -- Right: Inserting SSD into Laptop (Courtesy: Sukhdev Taneja, BlogDaraz.com.bd)
The red cable with the narrow black plug is for data transfer. It connects to a fitted female socket on the motherboard. Beyond finding a good spot to mount the disk inside your computer with screws, that's all there is to it. Of course, you want to visit your Configuration panels after adding the drive to ensure it's recognized by the PC, and you'll also need to have it formatted prior to use.
For laptops, open up the disk drive bay by unscrewing the holding screws. Then simply push the drive in, connector-side first. You should feel it push into the internal plugs. The righthand photo above shows inserting an SSD into a laptop.
Make sure that the thickness of your laptop drive is suitable for your computer. Most drives are interchangeable, but not all. For example, some are slightly thicker or thinner than others. If you want to put a thinner drive into a thicker drive bay, you can tape an old credit card (or other piece of plastic) to thicken it appropriately. Of course, you simply can't squeeze a thicker drive into a thinner bay.
Add M.2 Drive: M.2 drives look a bit like memory sticks. They require a M.2 mounting slot on your motherboard.
As this photo shows, there are several different M.2 mounting standards. The disk you insert must match the slotting -- or key -- at the connector side of the drive. Note the different keys at the bottom of the drives in this photo:
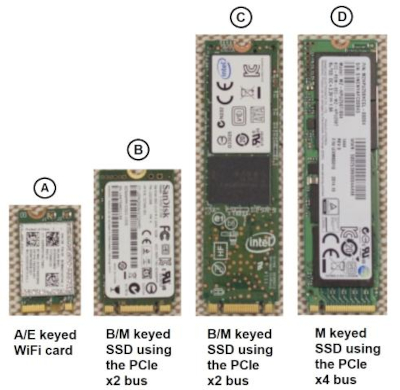
Your M.2 Key Must Match Your Motherboard's Key (Courtesy: Dell)
These two photos show inserting and screwing the drive into the M.2 slot.

Adding the M2. Drive to the Motherboard (Courtesy: TechRadar)
You'll want to visit your Configuration panels to ensure that the new disk drive is recognized by the computer. And then you have to format it for use as well.
If you need more detail about adding internal disk drives, read this article about SATA drives, or this one about M.2 drives.
Disk Problems -- How to Completely Erase a Disk
There are two situations where you might want to completely and thoroughly erase all data on a disk drive.
One is where you're giving the disk away -- usually when you dispose of your computer at its end of life. You absolutely do not want to leave any trace of your personal information on that disk. You could be a victim of identity theft if you don't thoroughly wipe it.
(Of course, you could just physically destroy the drive with a hammer. But if you instead completely erase the drive, it can be reused.)
The other situation is where you acquire a used computer. In this case you have no idea what data might be on that computer's disk(s). It could include pirated or stolen software, films, music, or pornography. You don't want to have illegal stuff on a computer that you could be held responsible for -- even though you didn't put it there and may not have even known of its presence.
So how do you completely erase a disk?
It depends on whether it's hard disk drive (HDD) or solid state disk (SSD).
What if you aren't sure whether you have a hard disk or solid state drive? Inspect the disk carefully. It will usually tell you which it is somewhere in the labels or the small print. If not, write down the manufacturer, model number, and part number, and google these on the web. It should be easy to find out which kind of drive you have. Then you'll know whether you need to run a traditional HDD data wipe program, or an SSD secure erase utility.
Hard Disk: To completely erase a hard disk, just download and run a free tool like DBAN or a competitor. These programs boot on their own (independent of your normal operating system). They simply overwrite the disk and thereby destroy all its data.
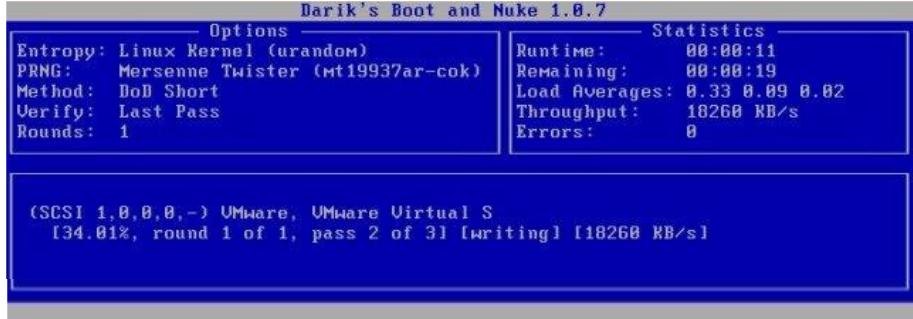
DBAN Wiping an HDD Disk (Courtesy: DBAN)
These "disk wiping" programs usually have some parameters for light wiping (faster) or more thorough wiping (slower). To ensure your data is truly unretrievable, use the thorough settings. This often runs for hours -- it depends on your disk's size and speed. Often it is convenient to run a thorough wipe overnight.
Solid State Drive: For an SSD, you need a different kind of tool. The tools that work for HDDs do not work for SSDs! You need to do what they call a secure erase.
Some computers come with an secure erase utility in their UEFI/BIOS. All you have to do is access the boot configuration panels to run it. It will usually be labelled something like "ATA Secure Erase."
The other option is the website of the disk manufacturer. Many offer free downloads of secure erase utilities for their SSDs.
Unfortunately, some vendors don't provide a secure erase utility for some of their consumer drives. In this case, your only option may be to purchase a tool like Parted Magic for $15 (a delivery charge). Or, if your goal is simply to get rid of your data before giving away the drive, you can instead physically destroy the drive with a heavy hammer.
Optical Disc -- Disc Stuck in Drive
Three common problems occur with optical discs. First, what do you do when a disc gets stuck in the drive. After that we tell how to fix read errors, and finally we cover what to do when an optical disc drive fails.
You're watching your favorite old DVD, when yikes! It gets stuck in the disc drive. No matter if you tell software to eject it or unmount it, the drive won't open and give you back your disc.
Fortunately, this is easy to fix. Look closely at the drive face and you'll see tiny hole. Stick a straight pin in there and push a lever that will mechanically push out the tray. Do this with the computer powered off since it is solely a mechanical procedure.
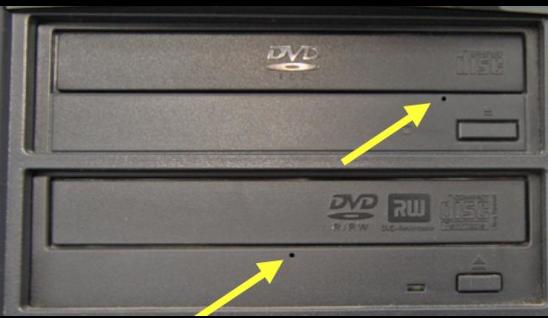
Front of DVDs Showing Pin Holes (Courtesy: DigitalUnit.com)
Optical Disc -- Disc Read Errors
What do you do when you pop a DVD or CD into your optical drive and it fails to read? You'll often hear shuffling noises and as the drive tries to error-correct by reading the disc multiple times.
You could have either a faulty disc on your hands, or a bad optical disk drive. You can tell which simply by inserting another disc into the drive. If it reads, you know your first disc is bad. If the drive can't read any discs at all, you know the drive is bad (see the next section for solutions).
Clean or Fix the Disc: If you have a bad disc, you can often fix it simply by carefully wiping fingerprints or other pollution off the disc. Wipe the disc with a proper cloth like you would use for cleaning your computer display screen. Don't use paper towels or toilet paper as these may scratch the disc.
Inspect the disc carefully at different angles under a bright light. (You want to look at the side without the label, as this is the side the computer reads.) Look to see if scratches prevent the disc from being read. You can eliminate these scratches, or at least reduce them to within tolerance of the reading capability of your optical disc reader.
With a stream of warm water, rub a small blob of toothpaste very lightly on the scratches. Rub from the center of the disc towards the outside.
Yes, I said toothpaste. It is a mild abrasive, meaning that rubbing it on the optical disk can reduce the depth of scratches.
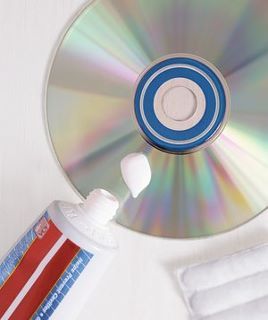
Using Toothpaste to Fix a DVD or CD (Courtesy: Pinterest)
Just rub a little -- not too much. Your goal is to reduce the depth of the scratches in the outer plastic layer while not rubbing through to the substrate media beneath. You may want to rub just a bit, dry the disc and try reading it again, rub again, try reading again, etc. Proceed carefully, and after several tries, you'll find that even a lot of scratches or a very deep scratch will yield to your efforts. I've found that this trick works even for discs others have told me are damaged way beyond repair.
Optical Disc -- Drive Fails
First ask yourself: do you really need your optical drive anymore? In many cases, you can just use a USB memory stick (or "thumb drive") instead. They read and write data faster, and store more data. They cost less as measured on a cost-per-byte-stored basis.
If you do still need your disc drive -- say you have a DVD or CD collection -- keep in mind that new drives are cheap. But first check all connectors, ensure the OS recognizes the device, and that you have a working driver installed.
What if the problem is sporadic? First ensure that it's not the individual disc you're trying to read that is the problem (see the above section).
Clean the Drive: If you're certain the problem is your optical drive, try cleaning the drive. The easiest way is just to buy a cleaning kit. They're quite inexpensive.
Or clean it yourself. Here's how:
- Softly blow into the drive to remove any dust. Or use a can of compressed air to blow out any dust.
- Moisten the center of a soft, lint-free cloth with either a small amount of water, or rubbing alcohol. Don't use too much -- you don't want to drip liquid inside the drive.
- Place the cloth around a popsicle stick or long cotton swab.
- Carefully insert the cloth on the stick into the drive.
- Gently apply pressure as you move the cloth back and forth over the drive's lens.
- Remove the cloth and stick and allow the drive some minutes to dry before use.
Calibration: Another possible cause of problems is differing calibration between drives. It's possible to write a disc on one system and find another unable to read it. Determine if you have a calibration difference by testing multiple discs on several different drives.
Try Different Media: You might find that your drive works well with certain brands of disc media but not with others. Media differences can cause sporadic problems even with healthy optical drives. Remember that there are many optical media standards and that you have to match them properly to the drives that use them. While current drives support multiple media standards, you can't always mix all media in all drives (DVD+R, DVD-R, DVD+-R, DVD-RAM, Blu-ray, CD-RW, CD-ROM, etc).
Internet Connection Problems
Internet connection problems usually fall into three categories. Either the internet connection is slow, or your wireless internet connection is slow, or you can't connect to the internet at all.
Slow Internet: Start by measuring exactly what internet speeds you're actually getting. You'll use this as a baseline to compare to as you attempt different fixes from the following list.
Free internet speed tests are available at: SpeedTest.net and Fast.com. Don't do anything else on your computer while the test runs!
Now try some of these fixes:
- If you use a Virtual Private Network (or VPN), turn that off and now measure your internet connection speed again. This will tell you if your VPN is the bottleneck slowing down your speeds. If it is, switch to connecting to another intermediary VPN website. Or switch VPN providers if the problem appears permanent.
- See if slow speeds are due to the website(s) you've been viewing. Try viewing some other websites to verify or deny this.
- Reboot your modem (and router if you use one), and your computer. It's surprising how often this offers a quick fix.
- Determine if the problem is computer-specific by trying another computer or device on your network and seeing if it is faster or suffers the same slow speeds. This helps determine whether you have a device-specific problem.
- Slow internet could simply be the result of others using it at the same time as you. So make sure your connection isn't slow because of competition. At home ensure that no one is streaming TV video or computer games, or using other computers or internet-connected devices while you do your testing.
- Verify that the modem's firmware is the latest release.
- If you use a router that is separate from your modem, remove it from the picture to simply the problem-solving process. Now, directly connect to the modem. This simplifies the problem-solving process. It also will tell you if your router is the problem. If it is, verify its maximum speed and ensure that it is not a bottleneck because it's slower than your modem. Sometimes an older router will slow down a newer, faster modem. Also check that its firmware is up-to-date, and update it if it is not.
- Scan your computer to ensure it has no viruses or malware.
- Declutter your internet browser. Use an up-to-date product and consider turning off add-ons, extensions, or plug-ins that could be slowing it down. Keeping lots of tabs open at once can also slow you down. Close tabs for panels you're done using.
- Old modems and routers do not support the high speeds of today's internet. Check their ages and maximum speeds and replace them if needed.
- Compare your measured internet speed to the plan you purchased. (Be sure that you disable your VPN before this test.) It's possible that your internet service provider's system is congested, or that they are purposely throttling your connection. Or that they are unable to fulfill the speeds of the plan you purchased. The only solution here is to contact your service provider.
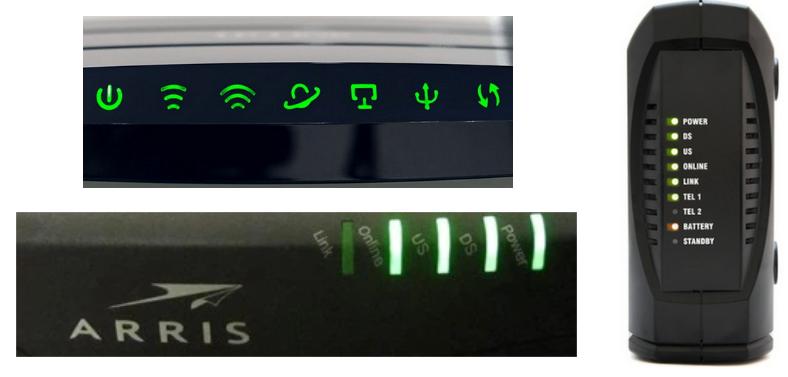
Knowing How to Read Your Modem Lights is Important (Courtesy: MyTechGuide.net, Ded9, TechWalla)
Slow Internet for Wireless: First, try the fixes for slow internet speeds listed above. Then try these wireless-specific fixes:
- Directly cable your computer to the modem (try a wired connection). If the speed differs from your wireless connection, that tells you to look at your wireless connection parameters, and ensure that your wireless device driver is enabled and up-to-date.
- Move your computer and modem closer to one another. Sometimes it helps to place your computer in line-of-sight of the modem. Ensure antenna(s) on the modem are not blocked and are securely attached and positioned.
- Check the modem to ensure that it is set for maximum broadcast signal strength and speed. Most modems have an option where you can set this lower. You don't want that to be the case when you're experiencing slow speeds!
- Adding a signal booster can increase signal strength and coverage if weak wifi is your problem.
- You could also replace the modem antennas (usually low gain) with high gain antennas.
- If you suspect signal interference, turn off other devices that could cause it. Or, change the channel (radio frequency) used for your modem/computer communications. Remember to change the channel both on the modem and all devices that will connect to it.
- Switch the modem communications from the 2.4 ghz band to the 5 ghz band. 5 ghz offers greater throughput speeds. (However, it sometimes doesn't handle distances and obstructions quite as well as 2.4 ghz.)
No Internet Connection: This is the situation where you have no internet connection at all.
First, always look at your modem's lights to see what it's trying to tell you. Refer to the modem documentation if you need to.
Next, you want to ensure you are trying to connect to a live internet connection. Do other devices (like streaming TV, streaming video games, or any other computer you can test) experience a live connection? If so, you've narrowed down the problem to your specific computer.
If you're trying to connect wirelessly, directly plug your computer into your modem using a cable (try a wired connection). If this works, you've determined that the wireless on your computer is at fault.
If no devices at all work with your internet modem, the connection itself may be dead. The problem could be on your end -- your modem -- or it could be an outage with your internet service provider. Check your modem, ensure it's turned on and appears to be working from its panel lights. All modems have a panel light or a test feature that allows you to verify whether it's talking to a live internet connection. This definitively tells you whether the problem is on your end, or whether your internet service provider is experiencing an outage.
If you have an internet service provider outage, all you can do is either call them or wait it out. Outages should be rare and short for ISPs that are competitive, except under rare circumstances.
No Wireless: In this case you've determined that your specific computer is at default. You can internet-connect the computer successfully using a wired connection, but its wireless connection does not work.
If you have another computer or any other device that successfully connects to your internet connection by wireless technology, look up the connection parameters for that other computer or device. Compare them to what you have defined on the defective computer. Copy them over into the defective computer. This may be a very easy way to fix your wireless connection.
If no other computer or device can use the wireless connection, check that the modem has WIRELESS ENABLED. All modems have a way to shut this off and you need to ensure that it's on. Also verify the modem's firmware is up-to-date.
If you have a router, simplify the problem by removing it and trying to connect devices directly to the modem. You can always add the router back in once you get your basic problem solved.
Verify that your modem is broadcasting on the same frequency and channel that your computer is set to use. Check that the wireless password for your computer exactly matches that assigned on the modem. Also check that your computer is trying to access the proper modem name (the proper SSID.) Verify that your computer is using an authentication / encryption method the modem recognizes. For example, if the modem is set for WPA2 Personal, make sure that's acceptable to the modem.
Modems shield out unwanted or unauthorized connections by a procedure called MAC address filtering. Make sure that your computer is not BLACK LISTED from a connection. Or put it into your modem's WHITE LIST if the modem is using that. You need to ensure that your computer passes any connection challenge the modem presents. Sometimes it's easiest to turn off all modem security schemes for a few minutes while you get your wireless connection working and ensure it's possible. Then right after you're done, be certain to re-enable all security and set your computer to conform to it.
You can find much more information on how to set up your modem properly here.
Let's get back to your checking your computer. Ensure it has a valid, up-to-date wireless device driver. Ensure wireless is ENABLED if you're using a laptop. You may have this turned off either by a physical switch or in the laptop's Configuration panels. Or it could be turned off in the wireless hardware DEVICES panel.
Finally, never underestimate the power of a simple reboot to resolve a problem you've been working on for awhile. Sometimes it's helpful to reset everything to ground zero and start over when a problem becomes confusing. Reboot your computer and modem both. If wireless doesn't work for any device trying to talk with your modem, perform a modem reset by pressing its RESET button. Get on the modem's Configuration panels by attaching with a wire (cable) and see if there's any other obstacle in there preventing your computer from establishing a wireless connection.
Printer Problems
In this section I cover two topics: what to do if your printer suddenly fails, and the printer maintenance you need to do to keep your printer in top working order.
Printer Suddenly Fails: If your printer suddenly stops working, there are numerous simple things you can do to rectify the situation.
- Check the lights on the printer. Error lights might tell you the problem. No lights tell you either the printer is not turned on, or that it is not connected to a live power source.
- Your printer might be in a sleep state. Press the ON button to wake it up for use.
- Does the printer have toner and ink? Does it have paper? Is it jammed?
- Most people define multiple printers to their software. Make sure you sent the document to the correct printer definition, and that this is your default.
- Clear the printer queue. Or stop and restart the printer service (aka the "spooler"). It often pays to start and start the printer as well. (And sometimes even your computer.)
- On your computer, check the printer control app. It might provide diagnostics you can run (This is often called the "printer troubleshooter" app).
- Verify the printer driver. Especially if you just upgraded the operating system. Sometimes a newer version can be downloaded and installed, or it might help to re-install the existing driver.
- When clearing a jam, be careful to remove all the paper involved. Often there a small separated bits you need to remove that may not at first be obvious.
Use ink cartridges that meet the printer specifications. If problems pop up just after installing a new cartridge, that means that cartridge from that manufacturer may not be adequate for your particular printer.
To reduce streaking and fading with inkjet printers, run the app that cleans the printer heads. Most have two settings: light clean and heavy clean. Try the light clean first. If that doesn't do the job, run the heavy clean.
For laserjets, streaking and fading usually result from low toner. Just get new toner. Should you have to continue and not have any more toner on hand, you can usually squeeze out a few more pages. Just remove the toner cartridge from the printer, and while keeping it closed, gently tip it from side to side. This sloshes the remaining toner around a bit, often allowing you to print a few more pages when you put the toner back into the printer.
Automated messages about ink levels can sometimes be misleading. You might get such a message when the real problem is that the print head is clogged or dirty. Use the printer app to clean the printer heads.
Or if the heads reside on the cartridges themselves, you can damp them off with a moist paper towel to clean them up.
If you insert a new cartridge and it's not automatically detected, you may need to manually "reset" the fill levels. The printer's documentation tells how to do this.
Connecting a Wireless Printer: Usually connecting a wireless printer is a cinch, but if you have trouble, you might try a wired connection to see if you can get the printer going at all. This will at least verify you have a working printer. Then you can focus on defining a working wireless connection.
You can also read this article or this one for further information.
Microphone and Sound Problems
If your microphone or audio don't work at all -- assuming they physically connect to your computer -- make sure they're plugged into the correct plugs on the computer. The plugs for both are the same size so it's easy to confuse the two. And ensure the cables are solidly pushed in.
You'll want to double-check that the mike or sound are enabled and not muted. Look both in your audio control app, as well as in the Devices panel for your computer hardware. It sounds silly but we've all been in the situation where we get frustrated and forget to check something as simple as whether the video at Youtube is muted.
Also check to see if the mike or sound are turned down to the lowest volume. This effectively turns off audio input or output.
Make sure that the default devices for audio input and output are the ones you are using. Audio control apps typically have a drop-down menu where you select which audio devices are active. Select the wrong one and you'll get no mike or sound.
Could you have disabled the mike or headphone/speaker in your UEFI/BIOS Configuration panels? Many computers have this option. Go in and ensure these devices are properly enabled.
If your browser is involved in audio, verify that its Privacy Settings allow mike input and audio output.
One more simple fix. It's possible to have your audio set up fine to work, but you need to reboot the operating system to pick it up. Sometimes a simple reboot can avoid lots of frustration.
You'll want to determine whether the problem is your microphone (or headphone or speakers). Or whether it's something to do with your computer or its software. If you have a different mike or headphone/speaker, plug it in and see if it works. This tells you that your device is at default, not your computer.
If you have another computer available, try the mike or headphone/speaker with it. If it works on the new computer, you know that the device works and that the problem resides with your computer or its software.
As with all devices, verify that your computer has a valid device driver installed. Sometimes it's worth checking that you have the latest driver version, too.
If your mike or headphone/speaker is wireless and uses Bluetooth communications, verify that Bluetooth is enabled and working. Sometimes it helps to turn off any other Bluetooth-connected devices that could be causing interference.
As you've seen, there are many locations to ensure that audio is enabled and working. That's the main trick to getting your mike and headphones or speakers working.
Conclusion
There's more to fixing computer hardware than any one article can cover. Yet you'll find that 90% of hardware problems are easily fixable. That's what this brief article addresses. I hope you've found it helpful.
You might also like my free complete guide on How to Get a Free Computer: Build It From Cast-offs.
Contact / Feedback
Please send any recommendations for improving this article --> gibberish webmasterA an-at-sign-goes-here RexxInfo a-period-goes-here org more-gibberish. Thank you.
About the Author
Howard Fosdick is an independent consultant who supports databases and operating systems. He's refurbished old computers for fun and for charity for many years. Read more how-to's and tutorials here.
No Warranty / Use This Information At Your Own Risk
The information and links in this document are are provided "as is" and without any express or implied warranties of any kind whatsoever. Use of this document constitutes your agreement to this statement of No Warranty and that you perform any activities solely at your own risk.
Resources
| Computer Hope | Tips for less technical people |
| FixingMyComputer.com | Basic but comprehensive |
| Tom's Hardware Forum | Great place to ask difficult hardware questions |
| Techsolutions.com | Troubleshooting tips |
| Computer Repair with Diagnostics Flowcharts | Includes flowcharts for diagnostic repair |
====> Like this article? Please spread the link love to Slashdot, LXer, or wherever!